
Page Setup Manager
Introduction
The page setup manager in Xitron needs to be setup according to the printer type you are using, the resolution you want to print, and the actual page size and margin values you want to use.
Before you can print it is important that the page setup manager is set up correctly otherwise the printer will reject the job when it is sent from the software.
Before we begin, ensure you know the canon designation for your printer type which can be any of the following:
Dye Ink
PM-200A
(PM-417D - 4.17" Dye)
PM-200Z
(PM-417P - 4.17" Pigment)
Pigment Ink
PM-210A
(PM-836D - 8.36" Dye)
PM-210Z
(PM-836P - 8.36" Pigment)
Making a Page Setup
In the Xitron Rip, open the page setup manager by clicking File -> Page setup manager or by pressing the page setup manager button.

There may already be some page setups listed in the page setup manager. These may or may not match the printer configuration being used.
After you have opened the page setup manager, click the new button to start a new page setup:

A new page setup window should come up that looks similar to the following:

Under Output Device, select the canon designation for the printer you are using. For this tutorial, we will be setting up a PM-417P which has the canon name designation: PM-200Z

Next, choose the resolution for the page setup.
1200x1200 will print higher quality but at a slower speed.
600x600 will print slightly lower quality, but at a faster speed.
Note: 600x600 is the image resolution while 1200x600 is the actual print resolution.
Once you have selected your resolution click the button "configure device" and choose the correct print speed for your printer and your resolution. Most of the other settings in the configure device window do not need to be changed.
DYE Printers
PM-200A & PM-210A
1200x1200 - 200mm/s
600x600 - 400mm/s
Pigment Printers
PM-200Z & PM-210Z
1200x1200 - 150mm/s
600x600 - 300mm/s

After the printer type and resolution have been set, you will need to confirm that the Separations are set up correctly. The recommended settings for the separations are the same for all types of Postmark printers, but note that further refinement can be made to the separation style for different applications. Consult the Xitron manuals and knowledge base for more information on separation styles.
Click the button next to the separation styles to open the separation manager, choose CMYK Composite, and click Edit:

The default settings recommended are as follows:

Copy the settings shown above and press the OK button to save. Then press OK on the separations manager window to save the changes and return to the page setup manager. Ensure that the style in the page setup manager is set to CMYK Composite.
While color management containing ICC profiles can be selected in the page setup manager it is recommended to leave (NO Color Management) selected. This allows the operator to select the color management in the workflow rather than having to edit the page setup. For most cases, trapping, calibration, and tone curves are also not used.
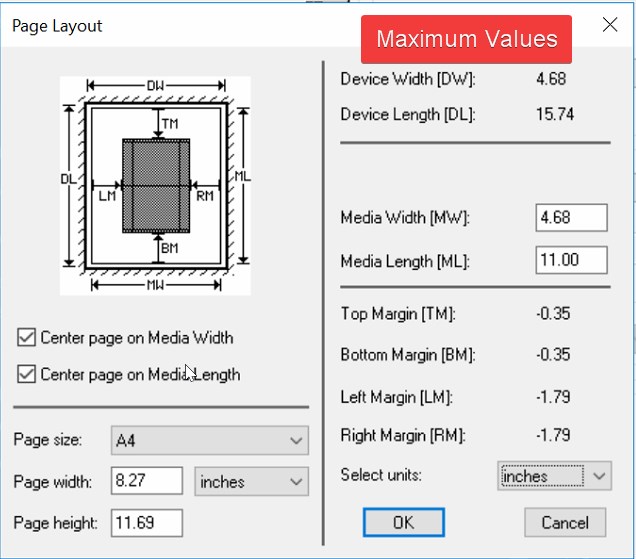
The last main item to set up in the page setup manager is the page size. Click the page layout button towards the bottom left of the Page Setup window:

The page layout screen should come up which can be a little overwhelming at first, although there are only a few settings that need to be made (depending on your application). For most applications where the input artwork matches the media size, only three settings need to be adjusted which are as follows:

The media Length should match the length of your media in the direction of belt travel. For example, a number 10 envelope that was being printed lengthwise would have a media length of 9.5" while a 4" x 4" coaster, would have a media length of 4.0". If the media length in the page setup is longer than the media that is sent through the printer, an error will occur.
While the media width can be adjusted, it is recommended to set up artwork to have the maximum width that lines up with the printer you are using ( 4.17" for the PM-417 and 8.36" on the PM-836). With the check box on the left for Center page on media width, all artwork with a width under the maximum will automatically center on the printhead without the need for adjusting the margins. The printhead can also mechanically be adjusted to move the print position on the media. If you prefer to move the print position of the artwork with margins, consult the Xitron manuals and knowledge base.
If you input artwork is set up to match width of the printhead and the actual length of your media, the only setting you will need to change is media length.
Note that the maximum values for the print page size (not necessarily the printed area) are always listed in the page layout screen in the top right corner:
Most of the other settings on the right side of the page setup window do not need to be set up as they are not applicable to the postmark printers or they can be selected in the workflow settings.
Once your page layout has been set up (the above is setup to feed letter sheet through on a PM-417) press OK to save and return to the page setup window.
Press the Save As button in the bottom right to save your new page setup. It is recommended to put the resolution in the setup name so you can identify it from the client.

Your new page layout is ready to use. Be sure to press the refresh configs button in your workflow direct output settings when a new page layout is made.
